


A couple of days ago, I clicked through to a tutorial about all-in-one facings on Crafterhours. Although I knew how I line a bodice, I'm always interested in how other people do things. And it turns out we do it differently! After a very pleasant exchange of emails and ideas, I was encouraged to share my way of doing it so here we go...
By fully lining a bodice, not only is it a neater finish and a way of hiding your seams but it's possible to encorporate it a fully reversible dress. Personally, I find it quicker than facings or bindings. This method of works if your back piece has a centre seam that makes it two pieces (so you can put in a zipper or a slit or a button placket). If you have a single front and back piece, this is not the way for you...
- You will have a front bodice and two back bodice pieces, and identical pieces cut out of your lining. Sew the shoulder seams like so:

- Repeat for lining pieces.
- Right sides facing, place the shell bodice on top of the lining bodice, match up all the edges and pin in place.
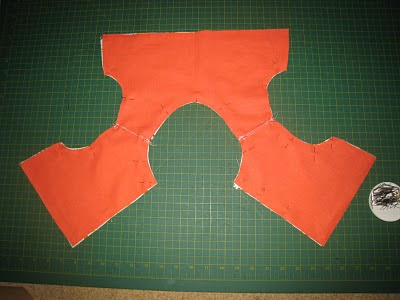
- Sew them together along the neck curve and armhole curve.
 In this picture, I am making a slit with a button so I've also sewn partially down the centre back seam. Don't do this if you're not making a slit!
 - Clip into the seam allowances around the neck and arm curves so they can be pressed flatter.

- Push each side of the bodice right side out through the front bottom hole. Manipulate with your fingers so all seams lie flat and corners are sharp. Press into position with the iron.

- Bring one of your back pieces down onto the front piece, matching up the four raw edges from the armpit down to where the bodice ends. It should be a sandwich of shell, lining, lining, shell. Right sides facing, pinch the two bottom corners of lining together, leaving the two shell pieces hanging loose (I've flipped a shell piece up so you can see better).

- Pull the shell corners up (rigth sides facing) and pin along both raw edges, up and over the seam line where the fabric changes (pic on right below). Right sides facing, you have now pinned together lining to lining, shell to shell.

- Stitch along this edge. While you are stitching, pull and manipulate the fabric so it is a straight line. Clip into seam allowance where the two fabrics meet, and then flip it open again and your side seam is created. Press in place.

- Repeat this process for the other side seams of the bodice, and you will have this:

- If you're doing a slit and button closure (as I am in these pictures), repeat the same process as you did to the side seams to the centre back seam.


This is a cool method! Thanks for sharing!
ReplyDeleteThanks so much for posting this, Amanda! I'm definitely doing it this way from now on. I just linked to you.
ReplyDeleteThat's very smart.
ReplyDeleteAnd I love that mermaid fabric. I won't tell you the amount of time I've spent trying to get my greedy mitts on some (and failing).
Great tutorial! Thanks.
ReplyDeleteOhh great, thx for sharing!! This all coming to me now!! Lol
ReplyDelete:)
Great job. That is a simpler way and what I would do most of the time. It's always good to see how other people do things.
ReplyDeleteAwesome! I need to try this asap. :)
ReplyDeleteThank you for sharing your method for lining a bodice! I linked to your tutorial on Craft Gossip Sewing (to go live Sunday morning):
ReplyDeletehttp://sewing.craftgossip.com/tutorial-two-ways-to-line-a-bodice/2011/03/06/
--Anne
Thank you for posting this! Very useful.
ReplyDelete(Also i made the dress for the first time today - yay long nap! - and I have to say it was great fun. The instructions are spot on and - once i get some elastic tomorrow morning - i'm really pleased with the results. hopefully i'll post the finished piece on my blog this week. anyway - many thanks!)
Thanks for showing this cool tutorial. I've always wondered how this was done :)
ReplyDeleteHey, that's my daughter's favourite party dress in the making!!
ReplyDeleteI WILL learn how to sew better :) Great tute.
That's the way I do mine! Professional and a great finish!
ReplyDeleteThank you for sharing this! I used it last night and it turned out great! http://afewthingsemilymade.blogspot.com/2011/04/ansleys-easter-dress.html
ReplyDeleteAwesome tutorial! I don't have a serger so I normally try to do all French Seams because I haven't had much luck with zig-zagging. I was wondering if there was a way to fully line a bodice like you have done above, but for one with sleeves?? The armscycle is always my downfall. I never know how to finish the edge so it looks nice and doesn't fray. I've tried bias tape, zig zagging, and turnning a hem, but if I could just line it somehow(without having to hand-sew ick!), that would be awesome! Any tips or tricks?
ReplyDeleteThank you for this tutorial, I can't believe the pattern companies won't tell us how to do this in the pattern instructions!
ReplyDeleteThis tutorial just saved me when making a dress for my daughter's birthday---the instructions on my pattern were so unclear! THANK YOU!!!
ReplyDeletethanks for your tutorial..now i can smile doing this..
ReplyDeleteThank you so much , Ive been wrestling for the last hour trying to get this bodice lining to turn. I realise I made the mistake of sewing the back seam of the dress first, before putting the facing in place. Its a childs dress with a small opening at the back, its all clear now, much appreciated!
ReplyDeleteinsight at last! many thanks :)
ReplyDeleteThis is how I do them, too! Thanks so much for sharing. Now I'll have to go see how the ladies at Crafterhours do it. Great post!
ReplyDeletePerfect tutorial - I'm a begginner and aced it! Thanks
ReplyDeleteObrigada pelo tutorial, foi de grande ajuda.....
ReplyDeletehello muffin, creepin on this tutorial. herp dee derp.
ReplyDeletethank you!!!
ReplyDeleteDoes this work on a bodice that is not split up the back? I can't visualize turning it right side out again if the neck hole has been sewn all the way around.
ReplyDeleteI need to know soon! I am making my daughters dresses for Easter! :)
Laurel in MN
Hi Laurel, this method of lining will not work if there isn't a split up the back as (like you thought!) it wouldn't be possible to pull through the shoulders if the back is a single piece. You could, however, split your back pattern piece up the middle and add seam allowances to use this method. When you sew the neck, stop where the split is (leaving the whole back piece open) and then at the final step sew the back entirely up to the neck as you did the side seams. How is your bodice constructed? Does it just pull over the head or does it have an opening of some sort?
DeleteThanks, Amanda. I'm not sure yet. I ordered the pattern online and it hasn't come yet. From looking at it online, I was thinking there was just a front and back piece and it pulled over the head, but now I am thinking there might be a zipper in the side. I will get back to you after the pattern arrives! Thanks so much for your help!
DeleteLaurel :)
Muchas gracias. Thanks this tutorial helps me a lot!!!
ReplyDeleteI now finally understand. Thank you so much!!
ReplyDeleteAlso: yay for orange
Thank you very much for this easy technique. But I have a problem. I have to add darts on back shoulders, bust and waistline. Any advice?
ReplyDeletePerfect! This is how I remembered doing it, but wasn't sure I was right and I hate pulling out stitches! :o) Thank you!
ReplyDeleteCharlie @pickledokra.blogspot.com
Thanks so much for this tutorial. I'm learning to sew and wanted to line the bodice of a dress from a Japanese pattern book for GD turning 6 very soon. It turned out perfectly (miracle in my own sewing room!), hope the rest of the dress does also.. This is only my third garment, I've recently sewn a nightie and the O & S Popover dress for GD, so I'm very happy.
ReplyDeleteIs it necessary to top-stitch the neck and armhole edges? It seems you didn't do this, and was wondering if it's OK not too, I reckon my imperfect top stitching will spoil it! I'm pretty sure DIL won't be ironing this.
This tutorial is so helpful. It explains it much more clearly than the pattern I have!
ReplyDeleteThank you so much for this tutorial. Another pattern I have did not sew the shoulder seams first - making it well - messy to say the least. This tutorial is significantly clearer. Now I can easily add lining to my patterns :)
ReplyDelete