

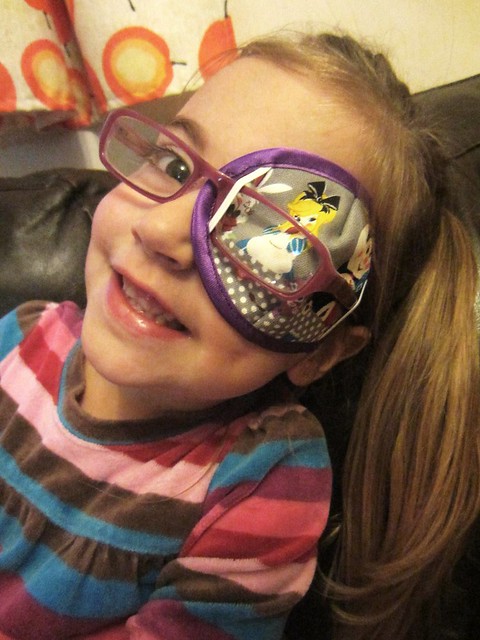
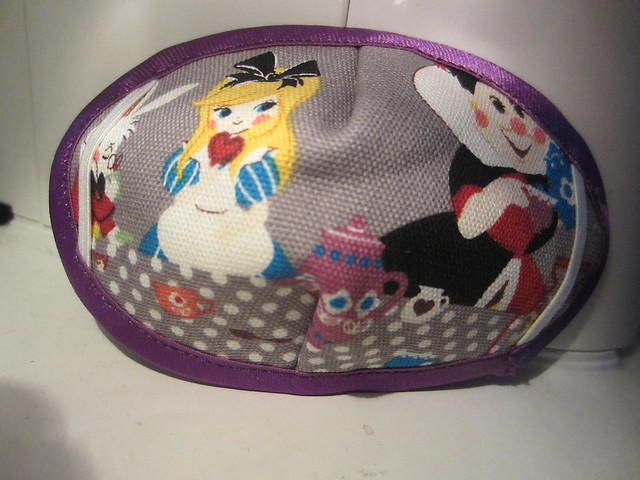
Some details about the patches: They consist of three layers (snazzy outer fabric, mid to heavyweight inner fabric, and soft flannel lining). The snazzy layer is self-explanatory, the inner layer is to give the patch some rigidity and also block out light, and the flannel (I've always used black) is so there's something nice and soft on her face. These patches are designed to fit my daughter's plastic moulded frames, which don't have nose guards. The patch is hooked onto the glasses with elastic, and then is essentially held on to her face by the glasses. Make sure the glasses are well fitting, as if they slip down the nose, the patch goes with it. No peeking is the general rule when it comes to patching. There are darts so a dome is created around the eye, meaning the vision is removed but the eye can still blink normally. The patch also extends well on to the leg of the glasses. No peeking, and no giving me the side- eye. We all win.
One feature of this patch that is optional is the bias binding. If you're just going to test the suitability of this type of patch, I'd do it initially with just a serged / rolled / overcast zigzag edge. Although the binding does give it a bit of stability and shape, it also adds a PITA factor of at least ten. Twenty if you use satin like me. The reason why I started binding the edges was because Maia complained that the stitching was scratchy. However... every time she complained about having to patch because of something specific, I changed it to accommodate her. Not because I am the best mum ever, but because she was going to wear that patch and there is not a complaint in the world that I will not thwart so be quiet and put your patch on.
A caveat: I am not an optometrist, nor do I play one on TV. I have, however, shown these patches to our specialist who thought they were better than the cloth patches that the NHS endorse. They're bigger and firmer so there is less chance of peeking. And they've definitely worked for us, with a far better improvement in her lazy eye than they were expecting.
Now that you can't sue me
Materials: small piece snazzy fabric, small piece mid/heavy weight fabric (I use canvas), small piece soft lining (I use flannel, and always use black), 1/4" elastic, double fold binding (I use satin because I'm a masochist, and because my daughter is a special snowflake)
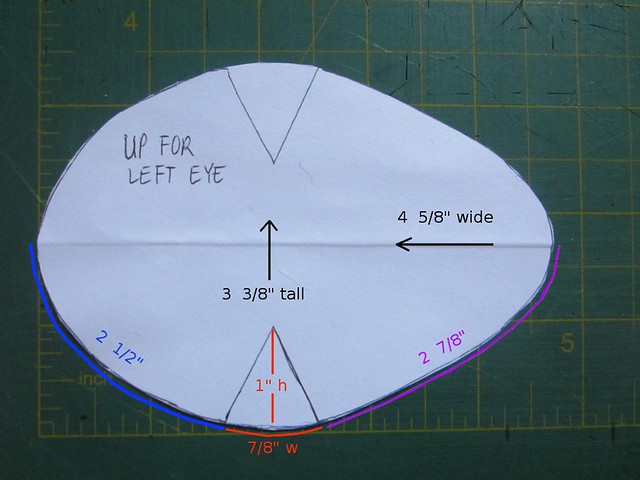
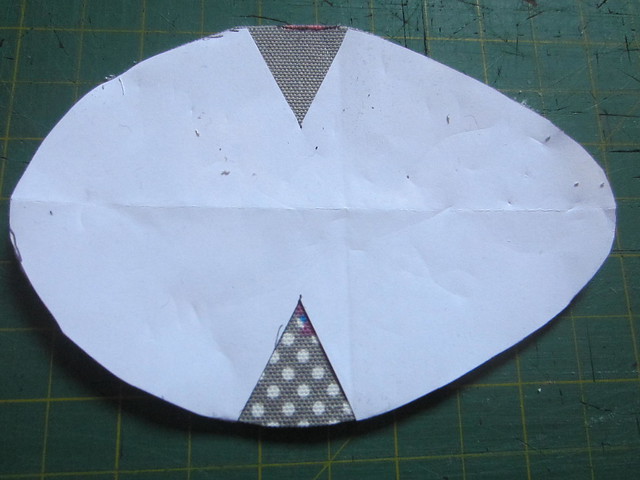
Here is the pattern. One of these days I'm going to figure out how to have a download-able pdf (anyone? anyone?) here. Please note that this is a patch for her left eye, if you need the right flip it for a mirror image. It is symmetrical along the horizontal fold line.
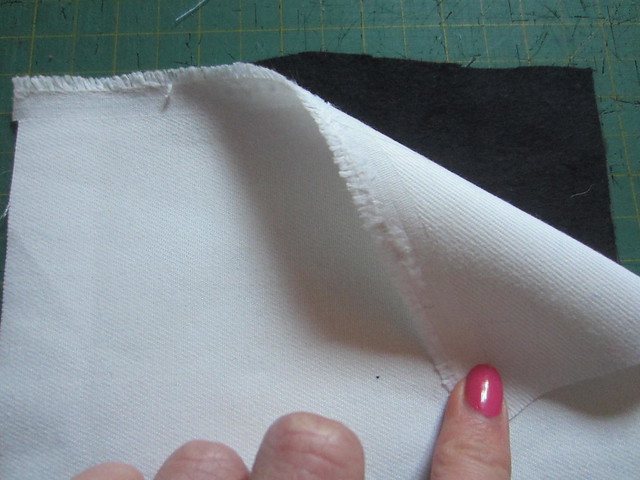
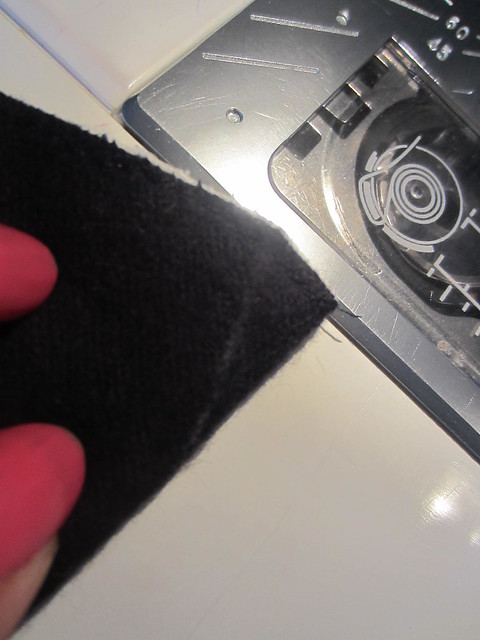
Start making a fabric sandwich. Black flannel at bottom, canvas next...
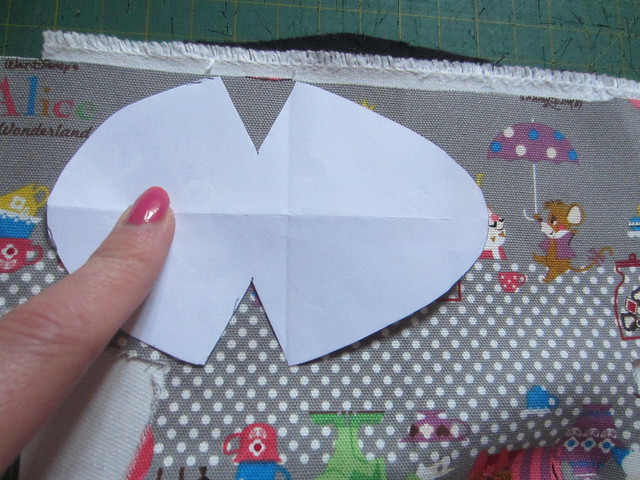
Fashion fabric on the top. I like cutting all of the layers together because I want them all the exact same size and shape. You will note that I also cut out the darts from the paper pattern. This is a special step for pedants who want to make sure the darts don't mess up the detail of the fabric.
Lovely fabric sandwich, non-obtrusive dart placement.
Baste all three layers together close to the edge.
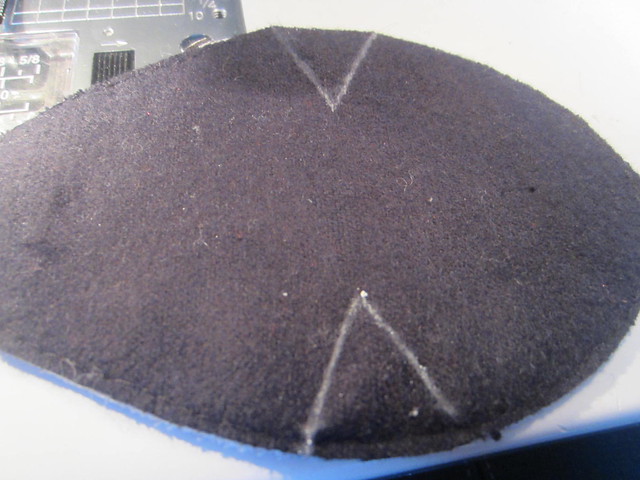
Flip it over and draw your dart lines with chalk on the lining.
Pin your elastic vertically 3/4" away from each end. Baste the ends in place at your previous basting line. **If you have glasses with nose prongs, omit the elastic at the inner side and make a centred 1" buttonhole there instead. You will slip the nose prong through the buttonhole to secure the patch to the glasses. The 1" size means that the patch can still be positioned easily up or down the face to ensure full coverage.
Fold your dart in half so the legs match up and stitch. Repeat for other dart.
Fold the dart to the outside (i.e. towards the leg end), and stitch it down along the basting line. Repeat for other dart.
Now you have a dome. Readers without special snowflakes, you can actually serge / roll hem / overcast zigzag the whole thing now and omit the hateful binding.
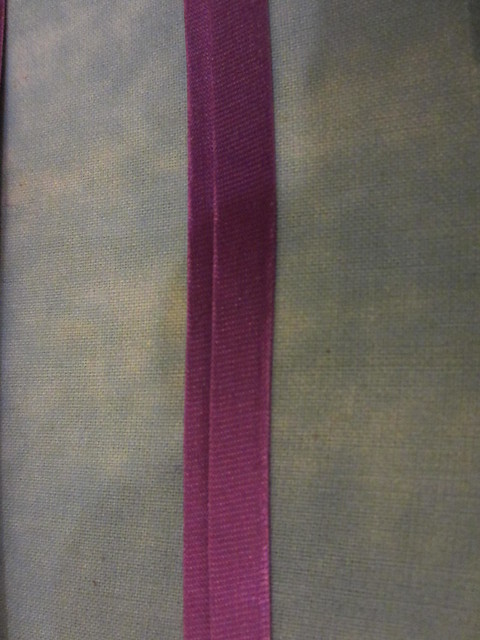
Fold and press your binding so the bottom portion is slighty wider than your upper portion.
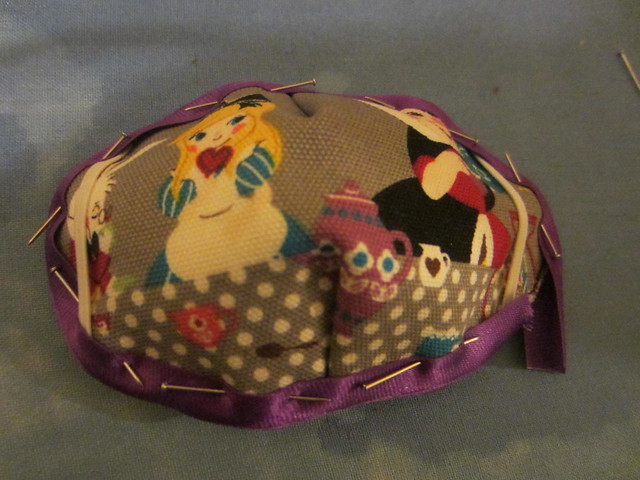
Starting at the elastic, pin your binding all the way around. Make sure that you are catching the fold underneath too. Pulling a bit on the binding will help you round the curves.

When you get back to where you started, fold the raw edge to the inside and then pin over the raw edge underneath.
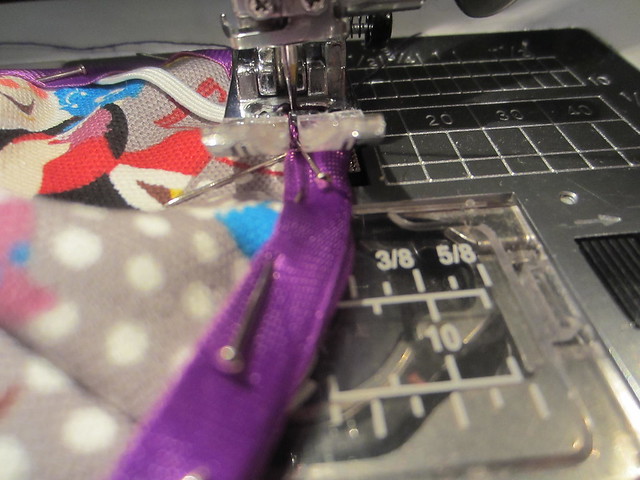
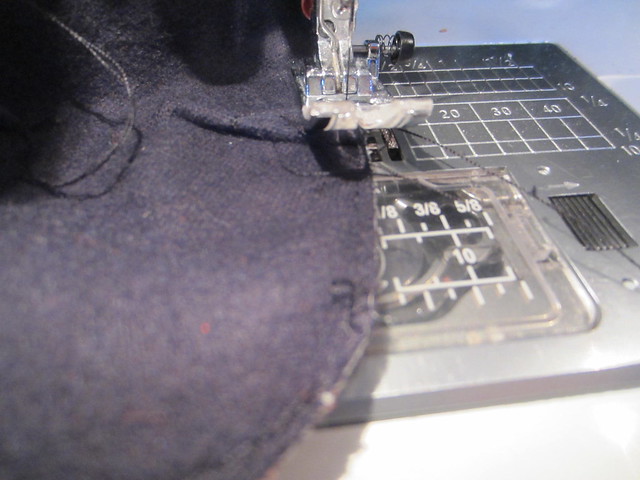
Start sewing just before the elastic (i.e. before the end bit that is folded over), going very slowly right at the edge of the binding on top. Remove the pins as you get close, smoosh down the darts so it's flat, leave the needle in the down position so you can pivot around the corners.
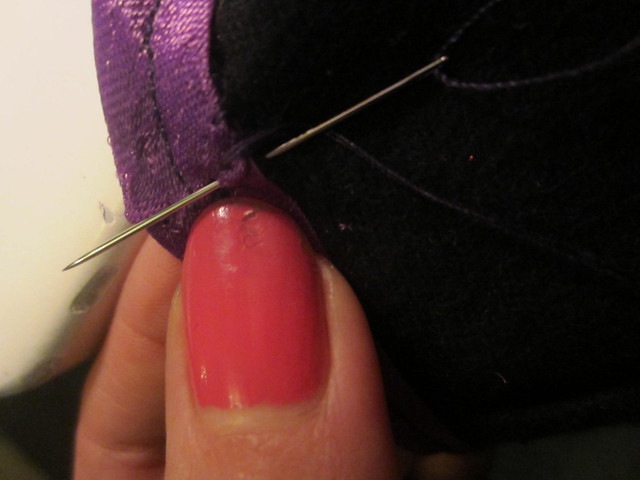
Because I hate satin bias binding, and cannot for the life of me stitch it neatly at the fold, I stop just before the folded end and slip stitch the layers together. And then you're done.
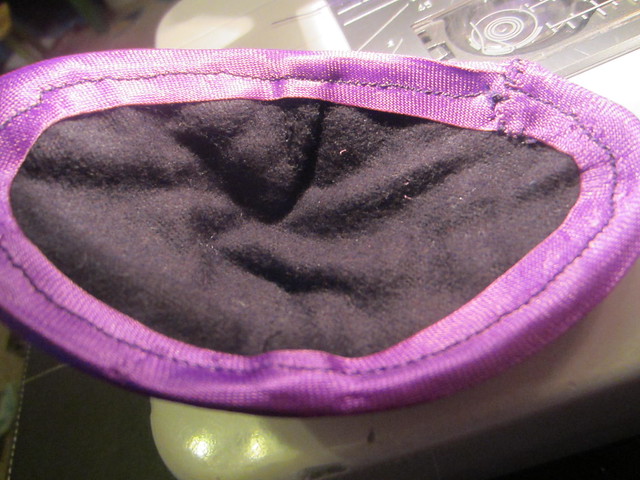
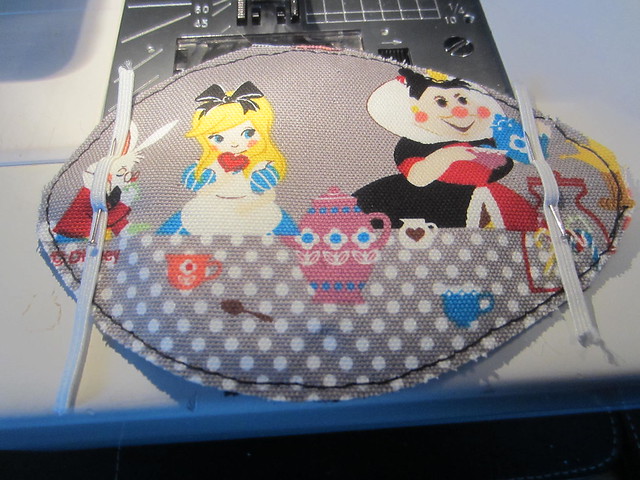
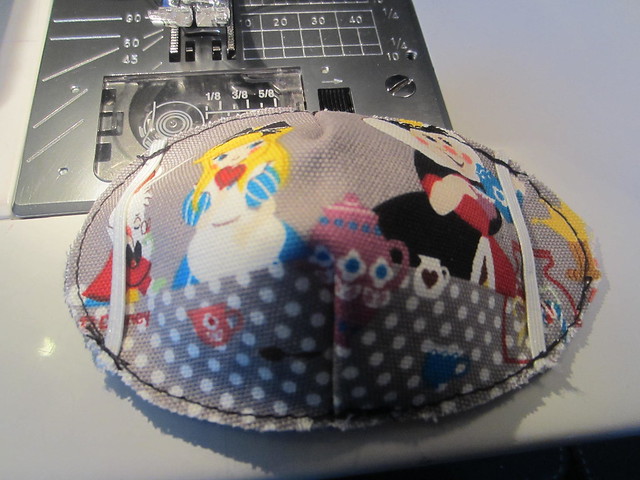
This is the (slightly wonky) inside. In my defense: satin bias binding. And shoulder bumps from my
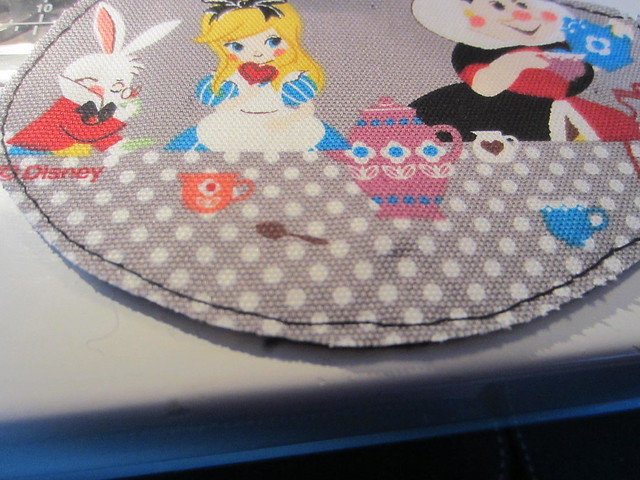
And the outside.
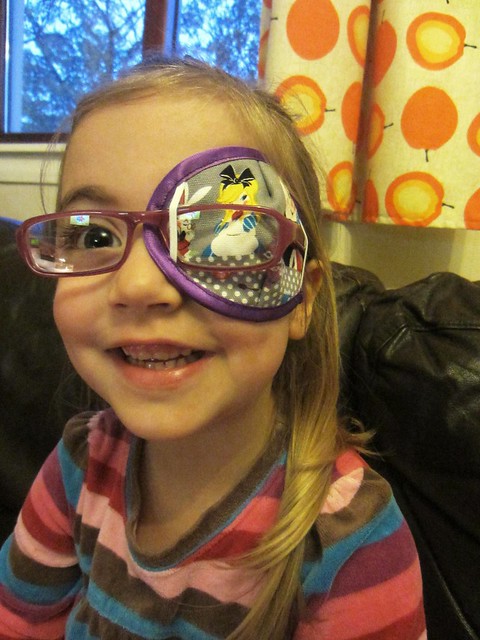
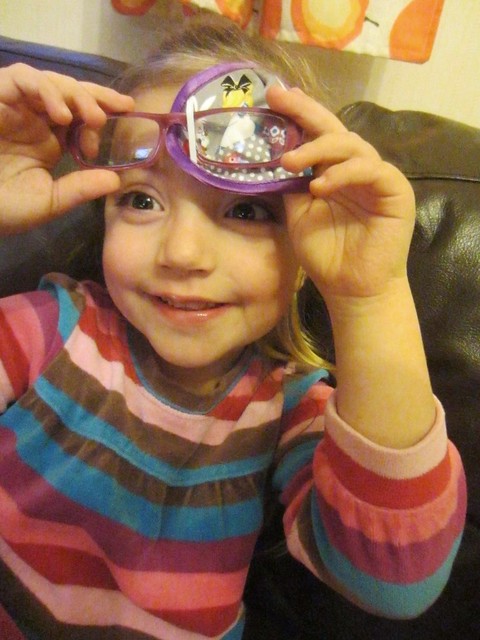
This is the proper way to wear the patch. The inner edge should sit on the bridge of her nose, rather than in the eye socket. The upper dart should be above the eyebrow and the lower dart on the cheek. Once those three are in position, pull the leg towards the ear to mould it to the face.
This is the improper way to wear the patch.
Thank you very much for taking the time to put up this tutorial. I've been waiting for it. No`w I'm out to sew a patch for my nephew!
ReplyDeleteI'm so glad this worked out for you and got such a big thumbs up from the optometrist. That's a poke in the eye for those commentators who accused you of being a bad mother!
ReplyDeleteIt's nice to have kids that are little snowflakes; I'll definitely be back for this tutorial if mine needs a patch in the future.
Thank you for creating this tutorial. I have a lazy eye myself and had corrective surgery done on it as a child. Now that I'm older, I find that my eye feels weaker. I'll be making a patch for myself to strengthen it.
ReplyDeleteaw very very cute!!! this is a gr8 idea! thanks for sharing
ReplyDeletehttp://infinitelifefitness.com
http://mscomposure.blogspot.com
Hi, just a bit of drive-by advice on making a PDF tutorial. If you are using Windows, install the free PDF Creator. It shows up like a printer and allows you to make a PDF from anywhere you could normally print from. Then just write your tute in Word, OpenOffice or whatever makes you happy, and away you go.
ReplyDeleteYou'll want to make sure your image files aren't too big. Picasa is good for simple image work like compressing.
brilliant! i work with kids 0-5 y/o with developmental delays, and if i have one whose parent sews, or that can't be bothered to get all the way to the eye hospital (1-2 hrs, for my kiddos and their families), i will make one myself or show them this pattern. thanks so much!
ReplyDeleteThank you for this! I whipped up a few patches for my own daughter but like your version better.
ReplyDeleteThank you! My six yr old dtr has just been dx with a lazy eye. She's a snowflake too, but proof of this around here is that I know the location of my sewing machine! Thank you for this contribution, so much
ReplyDeleteTHANK YOU! We've been patching for three years now and thought we were done. Doc says 3 more months so I'm off to the sewing room right now. You have no idea how I wished I found your site three years ago.
ReplyDeleteFound your blog while I was writing about Amblyopia for our patient information brochure.Lovely tutorial about making cute eye patches.....looks simple enough I could probably make it....NOT! Will refer our patients to your blog so they could make their own. Hope Maia is better now.
ReplyDeleteSo happy to find this and shared the link on my Amblyopia blog and facebook :)
ReplyDeleteI LOVE LOVE LOVE this ! thanks so much for sharing. Just found out my daughter has to start patching and she has plastic frames also, and i did not want to have to buy some plain uncomfortable eye patch that straps around her head. She will love this !!!
ReplyDeletethank you so much for this! love it!
ReplyDeleteI love that you personalized this for your daughter. She looks like a very happy little girl and I'm sure having a momma willing to make her some really cool looking custom eyepatches really helped her feel confident. Great job!
ReplyDeleteThanks so much for sharing. I have a girlie who is going to need patches for a long time and this will help greatly. And your satin binding looks great - satin is a bear and I can't even imagine it as binding. But I bet it is soft and smooth on little girl skin. =)
ReplyDeleteI have been looking for this! The black one with the elastic is just not working for us! I will post it on my blog when I have finished and link up to you!!!
ReplyDeletechickensbunniesandhomeschool.blogspot.com
Thank you so much for putting this tutorial up. My daughter has to start wearing a patch and I didn't want to use one of the sticky ones or the black pirate patch! They are both so uncomfortable. I had to wear a patch when I was little and wish I could have had a cute one like this. I'm glad that I can at least make it more comfortable for my daughter. I'm going to make a few of these today! Thanks again!
ReplyDeleteI am so glad to have found this! We "have been" patching for 3yrs now with that horrible black pirate patch. I'm crafty & love to sew but it had never occured to me to make our own cute & custom eye patch! So away we go to make one now!
ReplyDeleteI'm an adult facing major eyelid surgery in a couple of weeks and know that I'll need to wear a patch for several weeks. I wore the sticky ones for 3 months after getting Bell's Palsy a decade ago, and was not looking forward to repeating that. Since I'm a sewer, quilter and avid Pinner, I hoped someone would have thought of this so I wouldn't have to figure it out on my own. THANK YOU SO MUCH!!! I'm going to whip up a few different ones to make me happy and fashionable at work. Since I work with preschoolers, that might give some parents ideas too, if their kids needs to be patched. Your daughter is so lucky to have a mama who sews for her!
ReplyDeleteHi. I'm experiencing Bell's Palsy right now and wanted to make one. I was wondering what the measurements were that you used to make yours. Did you just use the kid size measurements from this blog? Thx.
DeleteI think you'd be absolutely fine using these same measurements, it yields a pretty substantial patch :)
DeleteI just used your tutorial to make 2 eye patches for my 7 year old granddaughter. Thank you for sharing.
ReplyDeleteGoing to be using your tutorial myself, but as my daughter's glasses are broken and the new ones aren't here yet, do you have any advice on adding an elastic strap that goes around the head to this? I bought some very soft, velvet ruffle elastic to use for my very own extra special snowflake. :)
ReplyDeleteMaybe add buttonholes at the nose area and the opposite edge and then thread the elastic through to fit?
Delete